
There are a lot of recycled and refurbished items out there. To be honest, I don't like a lot of them. It's that perfectionist thing again. They just tend to look....um....recycled, and not in a good way. The creations that really grab me are the ones that are amazing uses of things that don't look like what they actually are.
Case in point:
 |
| "Optical (2007)" via Stuart Haygarth |
The Optical chandelier is created from over 4500 prescription spectacle lenses. The lenses are hung on monofilament line which hang from a platform. The lenses form a spherical shape which imitates a disco mirror ball but rather than the light being reflected the light is refracted through the many layers of glass lenses. A magical explosion of light is created. The light is illuminated by a clear 100w incandescent bulb.
Materials : Prescription spectacle lenses, monofilament line, sprayed MDF platform
I stumbled across this one day when I was looking for some inspiration to create a chandelier of sorts for my bathroom to hang over the tub. This is the one I wanted:
 |
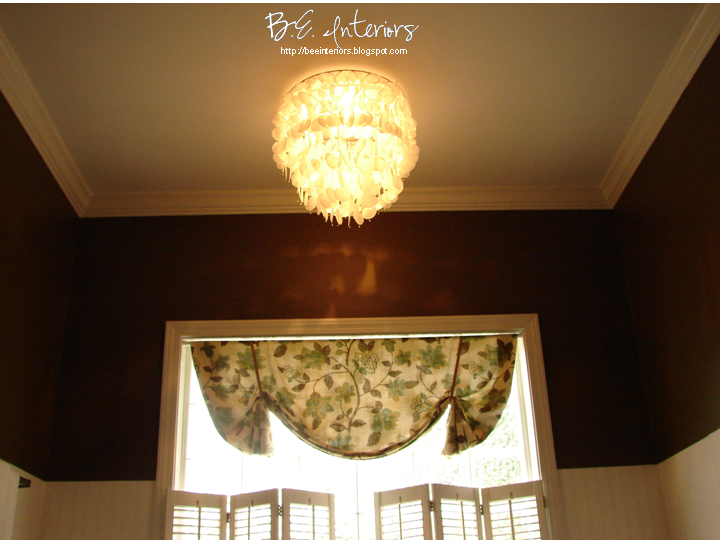
| Beaded Capiz Shell Chandelier via Designer Home Interiors (no longer available) |
There was just one small problem, while I don't have the price written down, I know it was WAAAAYYY out of my budget! So, I started looking for a way to recreate what I wanted. I considered other cheaper versions like the one at World Market ($69.99 = too much for too little) shown here:
 |
| World Market Large Capiz Shell Chandelier |
 |
| http://www.designspongeonline.com/2010/08/diy-project-brennas-paper-capiz-shell-chandelier.html |
As nice as this is, I didn't care for the ribbons and wanted the crystals as shown in my "want" photo. So, I got out the wax paper and went to town. Yes, that is WAX PAPER! I followed the directions for above for the most part, but I did a few things different.
 |
| My Supplies |
First, I used a plant basket I had on hand that I gave a fresh coat of glossy white spray paint. Then, I used fishing line and hot-glued the discs to it instead of ribbon. I sprayed the whole thing lightly with Folk Art Finishes Pearlcote Glaze Aerosol Spray and found some little crystal beads that I glued to the end of each line. This and the crystals are what turns a DIY project into a "piece de resistance" (not really, but you get the idea)!

The other problem I had was the building code around these parts won't allow a hanging chandelier over a tub and the existing light was a recessed can light with an ugly plastic cover over it. So, I popped the cover off, held the basket to the ceiling centered over the light, and marked three evenly spaced points around the circumference. Then, I inserted three small white cup hooks into the ceiling and put in the brightest halogen bulb the recessed fixture would handle (cooler than incandescent). Lastly, I hung the "chandelier" in the cup hooks and wha-la! I had me a classy "capiz" chandelier for less than $20 that also met code.


 |
| Updated image with center crystal droplet. |
 |
| Updated image. |
 |
| Ditto:) |
I'd still like to tweak it some. I may recreate this again if time ever permits and use a better basket I found at my local farm seed store. It is better suited to create a cascade effect of the "shells". I'd also hang each section at alternating heights so the "shells" don't create vertical lines going around the basket. Other than that, it came out pretty good.
If you want to find some beautiful stuff that could be recreated with some imagination and hard work, check out this website: http://www.olystudio.com/index.html. There are so many things on here I'd love to recreate for way less than they sell it for:) In fact, look what I found today while hunting for the "want" chandelier image - talk about coincidence!
 |
| It's called the Hanna Shelf. Look Familiar? Check out my Old Shelf Redo post. |
Miss Bee
p.s. If you want your "shells" to look even more like Capiz, don't over-iron. Perfectionist...here...went and ironed all the bubbles out, then realized they look more authentic with. This one of the reasons I want to redo this project. I also forgot to add the main big crystal in the center, so I've attached it and retaken a couple of photos. - update on 5/24/11
Linking to:
Hi,
ReplyDeleteThis is my very first time here and I'm really enjoying your blog. It's full of great things to see!
Please, drop by if you have a minute!'
Have a great day!
xo
Luciane at HomeBunch.com
My mouth is hanging open! Just when you think you have seen everything someone comes along with another ingenious idea! Unbelievable what you did with wax paper, fishing line and a plant basket- You are amazing! xxoo Diana
ReplyDeleteAmazing job!!! It turned out fabulous!
ReplyDelete~Angela
This is beyond fabulous! Diana is right, absolutely ingenious! I'm so glad I found you through your link at Kristin's Tuesday's Treasures Party.
ReplyDeleteHeather
Wow, I can't believe how it turned out! The addition of the little jewels on the end really made it a spectacular piece!
ReplyDeleteThanks for visiting my blog and leaving such a sweet comment! You can believe that it means a lot to me! I read your post about the bathroom chandelier and immediately became a follower of yours! You think like I did when I was a young lady....won't tell my age just yet but have two grown children older than you....LOL. My parents are 91 and 95 and have been married 72 years. I am in awe of your creativity and the ending result! Like you, I have wanted to hang a pretty chandelier over my jetted tub but once again, the dreaded code dealy. NOW you have taught me just how to get around that. I have a pretty crystal entry way chandelier hanging in my attic, but the electrician would not hang it for me.....not safe he says. So I am off to buy the supples you used, and am excited to get to work. I had to laugh at your comment about my thumbnail picture.....I thought it looked like a flying saucer....LOL!
ReplyDeleteW.O.W.!!!! So happy I found this over at Savvy Southern Style. I have a hall light that I've been wanting to re-do, and this looks like such a fun project. Its looks great!
ReplyDeleteLOVE THIS! I've been wanting a new lighting fixture in my dining room but don't want to pay an outrageous amount! This would be perfect!
ReplyDeleteCorine from http://nannaspretties.blogspot.com/
ReplyDeleteADORABLE!!!!!!!!!!! I love it, I am going to have to try this, thanks so much. Love your blog, stop by if you can.
This is fabulous, just love it!!! I think it looks perfect! Thanks for linking!
ReplyDeleteXO
Kristin
I love it. That is so cool how you made it. Thanks for sharing it at WUW.
ReplyDeleteThis is what i call out of the Box thinking.
ReplyDeleteI've been looking for a chapiz chandelier for my craft room and have the same problem I can't find one anywhere, and the ones I have seen online are way expensive. I cannot believe yours is made out of paper it looks amazing. I'm so impressed ;)
ReplyDeleteThis is A MAZ ING!!!!!!!!!!!!! Waxed paper???? Genius!!!!! It looks fantastic, so glad I found you! XO, Pinky
ReplyDeleteAmazing, just amazing. Love the little bead touch. Really does set it off. Thanks for sharing
ReplyDeleteThis is crazy! You are one patient woman!!! Just love it!
ReplyDeleteI have to have one! :) Wow! I am so proud of you! This is my first visit...and I love it...added you to my favs...Xoxo, Meme
ReplyDeleteI am having a CHALK PAINT GIVEAWAY! Ends Thurs May 26th...come check it out!
Oh my!! just saw your feature at Tuesday's Treasures, and I had to come see- I have been waiting to attempt the same thing :) Ditto on buying the capiz shells. (which is why the project still isn't done....) I am going to try this! Thanks for sharing your project, I'm excited to move forward now! If you want, I have a party on Wednedays called Transformations and Treasures, I know my readers would love this if you wanted to link up!
ReplyDeleteI cannot believe I missed this post! You are amazingly creative! It looks fantastic! I have been looking at capiz chandeliers for several months and have not been able to find one I like. This is definitely going to be added to ever growing to do/wish list!
ReplyDelete~ Tracy
Wow, thats all I can say, WOW! I have spent hours reading and looking at blogs and I have to tell you, this is by far my favorite!
ReplyDeleteIf you get the chance, please come to my blog http://www.lisa-sothisismylife.blogspot.com
Again, WOW
This is so cool. I just love it. I really want to try it one day . . .
ReplyDeleteThis is awesome as well.
ReplyDeleteI can't remember how I got here (somehow from googling "DIY Capiz light") but I wanted you to know that this is AMAZING!! I have been wanting to do this for a can light in my entry hall and I too wasn't too crazy about the ribbon approach over at Design Sponge but wasn't sure if something like fishing line would work - how has the light held up so far? Mine will be in the front entry hall and I'm worried the breeze from opening and closing the front door might wreak havoc on those little wax paper circles :)
ReplyDeleteThe best I've seen so far! The crystals made a huge difference and the planter was a great idea. I thought using the cup hooks was brilliant. Thanks for sharing it.
ReplyDeleteHugs...Tracy :)
Great job. the lights totally make the room! I have a website about nursery chandelier
ReplyDeleteChildrens Lighting available including crystal chandelier and childrens chandeliers, nursery chandeliers, kids bedroom chandeliers. We offer free Shipping on all chandeliers lighting.
So I've bought the parchment paper and the wax paper but I don't exactly know what to do with them now. Did you cut the circles out of the parchment paper or the wax paper? What did you do with the wax paper?
ReplyDeleteHow very clever! I'm moving on Jan. 1 back to an apartment I used to live in (could be a difficult transition; I was living there five years ago when my son, my only child, was killed right before Thanksgiving--but my former-now-future landlord did say he remodeled it "completely"...), and I want to make a new chandelier for the kitchen (strange old house turned into apartments, but it's also comfortable). This looks to be perfect--wax paper for a kitchen light...genius, no?
ReplyDelete
ReplyDeleteInteresting! I was thinking the same thing as you.