Wednesday, May 18, 2011

Burlap Walls Follow Up

Remember my Burlap Walls post? Remember how I said I had to find a way to get the wrinkles out? I think I have. I also think I found a better way to hang it...one I considered and for some reason decided not to do (stupid me).

Have you ever hung fabric on a wall with liquid starch? I read about this years ago when I was a newly wed living in an apartment desperately wanting to paint but couldn't. You can apply any fabric to the walls with liquid starch and it will peel right off when you're ready to take it down! And you thought starch was only for ironing white oxfords!

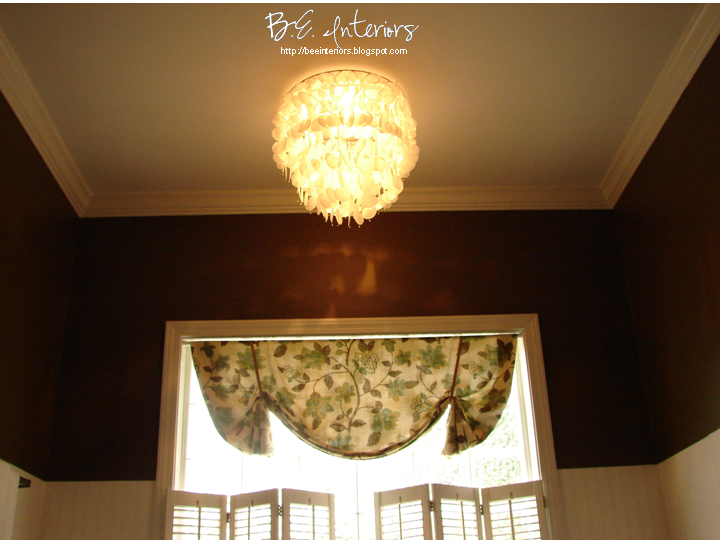
Let's revisit my powder room:

See the wrinkles? Ugh!

Like that mirror? I think I'll be doing a tutorial on that soon.


For the most part, I was happy with my walls. But those wrinkles have been driving me batty. I've racked my brain for a way to get rid of them. I tried:
  1. ironing
  2. steaming - NOT a good idea...makes it stretch and loosen up
  3. spraying with water...which worked but caused discoloration
  4. LIQUID STARCH?! Let's give it a go.
I realized I'd made a big mistake when I didn't TRY this. I assumed (and you know what they say!) that if misted water caused discoloration, so would liquid starch. Wrong (sort-of)! Even if it does, if you apply it all over like you should, the discoloration is even and I can assure you very slight if at all. When I was applying my fabric to the inside of my drawers on the French Sideboard Redo, I did a test with liquid starch on some burlap (because it was laying there) to see if it would stick and actually stay up. Guess what? It's freaky how well it works! Heavy Spray starch is good for fickle people...comes off easier, but doesn't have the same holding power as the liquid.

There is just one little drawback to using starch...your fabric could shrink SIGNIFICANTLY! The beautiful French script fabric I used was a linen/cotton blend and I cut it to size then put it in the drawers. When I came back later after the starch had dried, it'd shrunk by literally half an inch each direction! Lesson learned.

Yikes! Serious Shrinkage! This won't do.


Re-cut with extra half inch each way!


Liquid starch just poured in and spread liberally if working on a flat horizontal surface.
 

But this could be a good thing. My fabric is slighly loose on the walls, so some shrinkage could be a blessing. Am I scared to try it?! OF COURSE! If I screw it up, the hubby is going to freak because once again I'll be in there redoing that powder room. (This is why I did such a small room.)

We interrupt this post to allow the hostess to go and try this little experiment. She will be back shortly with the results..........(*cue elevator music).....

I'm back! And guess what....IT WORKED (I think)! What I mean is, I used spray starch first because I was lazy in a hurry for it to dry, and it took the wrinkles out perfect! But, it kind of rippled some in areas where I hadn't gotten it as wet as others. So, I went back with the liquid and brushed it on those areas. I'm waiting on it to dry, but I know if one worked, the other will.

Funny story: Hubby walked in and had a near heart attack as he started yelling for me to come in there! He thought a pipe had broken in the wall! I felt bad but... it was all I could do not to bust out laughing! He looked at me and said, "PLEASE give me a heads up when you're going to do something like that!" Here's what he saw:)


It does look like a pipe burst, doesn't it?! (LOL!)

Ready to see the results? I'm so excited I can barely contain myself! I was so afraid I'd mess it all up, but that rarely stops me from trying something (unless A LOT of money is involved). There was shrinkage, so do a test strip first or leave yourself an extra inch each direction to play it safe. To make a test strip, lay it on a board, draw an outline all the way around, then soak in starch and let dry. Then remeasure to see how much extra fabric to add to your measurements. When hanging it on a vertical surface, soak it in a bowl, wring it out, and then hang.

All right, check it out:


Provided it's dry tomorrow, I'll take another pic and add it to the post probably before most of you read this. In the meantime, I did take a pic of one of the areas that's been driving me mad that is dry. Notice...the wrinkles are gone! This was done with just the spray starch. The upper part is where I had to pull out
the big guns.

"By George, I think I've got it!"

Miss Bee

Tuesday, May 17, 2011

Some Project Hints

I spent most of the day crawling around on the floor cutting out fabric for one of my furniture projects you're gonna love. It would have been done possibly tomorrow if I hadn't messed up and cut out two pieces going the wrong direction on my repeat! It was more of my remnant fabric and I'd spent forever trying to make sure I had it all positioned correctly. Guess I didn't go it long enough. Since I messed up, I'm now out of fabric and had to go on-line looking for more. Luckily I found it, and it's not pricey.

My fabrics are almost always my jumping off points. Here's a sneak peak:

Premier Prints Barber Pattern in Taupe and Robin's Egg Blue
It drives me crazy that colors don't show correctly on screen. The blue is a gorgeous blue that pops more than it appears here.


Imagine this paired with Martha Stewart's Metallic Paint in "Tidepool" (a gorgeous mid-intensity turquoise/robin's egg similar to the bow above), Sherwin Williams "Creamy", and a taupe glaze. There's your hints. Now, I'm gonna be mean and make you wait to see what I'm up to. You'd have seen it sooner if I didn't have to wait now on a fabric order to replace my perfect amount of cut-up remnant! Ugh! See, even us perfectionist make oodles of mistakes:)

I'll leave you with a new inspiration pic I took the other day. Notice the color blends in this clover! Luscious!
"Clover"
B.E. Interiors Photography


Miss Bee

Monday, May 16, 2011

Amazing Recycle and a Knock-off

Man, I've been MIA lately, haven't I?! When Blogger went down last week, forcing me to take a little hiatis from the blog, I dove into my painting and got lost. I also took some family time all of which equals several days with no blog post! Anyway, I'm back and I have the coolest thing to show you!

There are a lot of recycled and refurbished items out there. To be honest, I don't like a lot of them. It's that perfectionist thing again. They just tend to look....um....recycled, and not in a good way. The creations that really grab me are the ones that are amazing uses of things that don't look like what they actually are.
Case in point:

"Optical (2007)"
via Stuart Haygarth
Is this thing not gorgeous?! Artist Stuart Haygarth created this beautiful work of art. Can you guess what he made it from? It's the lenses from old glasses!!!! Here's what his website said about it:

The Optical chandelier is created from over 4500 prescription spectacle lenses. The lenses are hung on monofilament line which hang from a platform. The lenses form a spherical shape which imitates a disco mirror ball but rather than the light being reflected the light is refracted through the many layers of glass lenses. A magical explosion of light is created. The light is illuminated by a clear 100w incandescent bulb.
Materials : Prescription spectacle lenses, monofilament line, sprayed MDF platform

I stumbled across this one day when I was looking for some inspiration to create a chandelier of sorts for my bathroom to hang over the tub.  This is the one I wanted:


Beaded Capiz Shell Chandelier
via Designer Home Interiors (no longer available)
 
There was just one small problem, while I don't have the price written down, I know it was WAAAAYYY out of my budget! So, I started looking for a way to recreate what I wanted. I considered other cheaper versions like the one at World Market ($69.99 = too much for too little) shown here:

Capiz Hanging Pendant | World Market
World Market Large Capiz Shell Chandelier
They all just seemed to wimpy as well as too expensive for my unfortunate "Champagne" taste. I thought about ordering the shells to make my own, but that wasn't going to save me much money in the long run. Gotta be another way. Finally, I found this on Design Sponge:

http://www.designspongeonline.com/2010/08/diy-project-brennas-paper-capiz-shell-chandelier.html

 As nice as this is, I didn't care for the ribbons and wanted the crystals as shown in my "want" photo. So, I got out the wax paper and went to town. Yes, that is WAX PAPER! I followed the directions for above for the most part, but I did a few things different.


My Supplies

 First, I used a plant basket I had on hand that I gave a fresh coat of glossy white spray paint. Then, I used fishing line and hot-glued the discs to it instead of ribbon. I sprayed the whole thing lightly with Folk Art Finishes Pearlcote Glaze Aerosol Spray and found some little crystal beads that I glued to the end of each line. This and the crystals are what turns a DIY project into a "piece de resistance" (not really, but you get the idea)!


The other problem I had was the building code around these parts won't allow a hanging chandelier over a tub and the existing light was a recessed can light with an ugly plastic cover over it. So, I popped the cover off, held the basket to the ceiling centered over the light, and marked three evenly spaced points around the circumference. Then, I inserted three small white cup hooks into the ceiling and put in the brightest halogen bulb the recessed fixture would handle (cooler than incandescent). Lastly, I hung the "chandelier" in the cup hooks and wha-la! I had me a classy "capiz" chandelier for less than $20 that also met code.


Updated image with center crystal droplet.

Updated image.

Ditto:)


I'd still like to tweak it some. I may recreate this again if time ever permits and use a better basket I found at my local farm seed store. It is better suited to create a cascade effect of the "shells". I'd also hang each section at alternating heights so the "shells" don't create vertical lines going around the basket. Other than that, it came out pretty good.

If you want to find some beautiful stuff that could be recreated with some imagination and hard work, check out this website: http://www.olystudio.com/index.html. There are so many things on here I'd love to recreate for way less than they sell it for:) In fact, look what I found today while hunting for the "want" chandelier image - talk about coincidence!


It's called the Hanna Shelf. Look Familiar? Check out my Old Shelf Redo post.
Miss Bee

p.s. If you want your "shells" to look even more like Capiz, don't over-iron. Perfectionist...here...went and ironed all the bubbles out, then realized they look more authentic with. This one of the reasons I want to redo this project. I also forgot to add the main big crystal in the center, so I've attached it and retaken a couple of photos. - update on 5/24/11

Linking to:


Wednesday, May 11, 2011

My Mural Info

"Cherry Blossoms 2"
B.E. Interiors Photography
I've gotten some questions about my mural and how I did it. Here's the skinny: it's an original. No decals, no stencils, no guides. Yes, folks...I did it all on my lonesome. This is where my graphic communications came into play. Prior to and during grad school I spent hours upon hours in computer labs using graphics software. Then, I used it with work on a daily basis prior to becoming a stay-at-home mom/wife. So, Adobe Illustrator and Photoshop are two of my best friends. I love those programs dearly and I've found you can do a lot of stuff other than the expected with them. For instance...create murals. For your sake, I wish I could say it was just a stencil kit or decals. For my sake, it's kind-of nice to know I have an original compilation.


Original "Woodland Night Scene Mural"
 On a side note: None of my inspiration photos I've shared have been touched up at all. Not that I would never use Photoshop to touch up, but I'm old school. As I mentioned before, I went through all my photography classes when we still used dark rooms and rolls of film. In my head, I've gotta get the shot to look great when it's taken...no editing except cropping (maybe).
When I said I spent hours looking for inspiration, I wasn't exaggerating. I must have pulled images from every corner of the earth. Trying to please Mommy and young son at the same time is not easy. I went on-line and typed in different searches in the images category. Those then became my inspirations. I compiled ideas to produce the final product in Photoshop and Illustrator. It took me a while to get it exactly so. Want to see some of my inspirations that I used while coming up with my final painting? Thought so. I do want to say, I have no idea where I got most of these photos from. Some are watermarked, but most aren't. I was just stockpiling ideas. I wish I could tell you who took these awesome pictures.  These are just a few I drew ideas from.


This would be why I offer to paint murals on canvas that can be applied to the wall. This is one project I just can't really give you step by step directions on. I can tell you that an overhead projector from your local school or library can be an immense help. I did not draw mine out on the wall. I created it digital and then printed it out on an overhead transparency.

Hopefully, this will answer some questions.  If you have more, please feel free to ask. I love getting comments and email!

Miss Bee
Follow Me on Pinterest