Showing posts with label lighting. Show all posts

Sunday, September 30, 2012

Upcycled Vanity Light


                      Source: decorpad.com via Miss B.e.e. on Pinterest 

These were my main inspiration pictures for my master bath redo.


                                             Source: houzz.com via Miss B.e.e. on Pinterest
 
This post is the beginning of a few on one of my most recent personal projects. It's only taken me a couple of YEARS to get it finished (and it seems like that long to post about it!), but hey... I'm just happy it's actually done! When we moved into this house, the master bath only had one or two things going for it. It was HUGE, had a nice tub and separate water closet, which is something I like in a house. The rest was, um, builder grade and boring beyond belief.

Master Vanity "Before"

The house was eight years old and the master still had the builder beige on the walls, gold/brass hardware and trim, glass block window, gray & white swirled cultured marble counter top, basic 12" ceramic floor tile, huge sheet glass mirror, cheap builder grade vanity lights and faucets in a mix of satin nickel & brass (!). Fortunately, the former owner had invested in the items that are much harder to update like the whirlpool tub and shower. They aren't what I would pick style-wise if I could start from scratch, but they are good quality and workable. Eventually I'd like to replace the tub with a free-standing floor model and take out the acrylic shower in favor of tile with glass surround. But, those are two very pricey and in-depth renos that may or may not happen any time soon.


                                                     Source: fortheloveofahouse.blogspot.com via Miss B.e.e. on Pinterest


In the meantime, I have worked on updating what I could on a tight budget. One of the most recent things was to redo the lighting and that is what I'm sharing today. Here's what I started with:


Vanity Light Before
As  you can see, the lights were pretty basic. They could have been much worse, but I wanted a change from the expected glass globe down lights. Initially, I looked for replacements. I found several I really liked and if you followed me on Pinterest you saw me pinning them. Here's a few I liked:


     Source: restorationhardware.com via Miss B.e.e. on Pinterest 

                                                         Source: lnt.com via Miss B.e.e. on Pinterest 


                                                       Source: wayfair.com via Miss B.e.e. on Pinterest


All of these options were still going to run a minimum of $100 each and like I've said before, I'm redoing a house on a super tight budget - one that squeaks! That was a conscious decision on our part for me to be home the kids, so I'm not complaining. They are worth far more than any "pretty" house! That said, I still want my home to look nice so I've become very creative on redoing on a shoe-string, and that creativity was tested to the limit with this project!

After taking down and reinstalling numerous off the shelf options from the local home improvement stores, nothing was working for me. Darn that champaign taste! I knew what I wanted, but couldn't afford it. Then a light bulb went off! One day after starring for "hours" at the old fixtures, it hit me they had a pretty good base shape. It was just the globes and color I hated. Could I recreate a satin/brushed nickel look? I've not liked any out of can options, but decided to experiment. I used both chrome and satin nickel spray paints in layers and got a good match to the existing faucets I was keeping. Bingo!

Now to do something about the glass shades. I wish I could tell you this part was easy, but it wasn't and you won't get a tutorial on this because I'm not sure I'd recommend doing it unless you have help like I did from someone with the right tools and know-how! Long story short, with my dad's help, we took out the medium base sockets and replaced them with candelabras. Goodwill shades found for $1 apiece were wrapped in white organza ribbon and wha-la! I had three light sconces I love for approximately $20 in parts and free labor. Just goes to show, if you are determined enough (read: stubborn) and think hard enough (read: drive yourself & your spouse crazy), you can find a cheap way to reuse more than you ever imagined!

My upcycled vanity lights!

Gotta say, I'm pleased as punch with my "new" vanity lights!


Wednesday, January 25, 2012

Wine Bottle Pendant

Once again, I'm dying to try my hand at another knock-off idea. Have you seen these beauties in Ballard Designs catalog?

Addie Pendant from Ballard Designs
$129.00

Does this remind you of anything?

According to the description, the idea came from looking at old bottles.


Now, the minute I saw this, I remembered seeing a bottle shaped almost identical. That's the way my mind works. I notice shape, form and color of everything! I'm constantly looking at and taking mental notes of items that catch my eye. The object that came to mind was a cheap wine bottle...Livingston.


They have a great shape with no handle!
via The Wicker House
The bottle reminds me of old apple cider vinegar bottles. I'll never forget that shape. When I was a little girl, my grandmother bought some and poured me a glass thinking it was apple JUICE! I've never much cared for the stuff since!

Anyhoo, the shape is perfect. With a bottle cutter,

via Silver Art Glass Jewelery 

via Everything Stained Glass


some silver stained glass taping,

via Etsy


a pendant kit with possibly some kind of extension for the socket to get it low enough into the bottle that a bulb could be screwed into it,

via Electrical Hardware Store
$19.97
(you can get something similar for $14+/- at Home Depot or Lowe's)

and possibly some glass paint,

via Life123 

you have yourself a copy cat! And you don't have to settle for just one of four colors.

I'm thinking a metallic shade or a color mixed with silver and thinned with a glaze (see link on image above for mixing info). Roll it all around inside the bottle, then leave it to dry. Or try a stained glass spray paint like this:

via Krylon 


Cut the bottle, add the silver edging and pendant kit, and wha-la! Your very own Addie Pendant for about half the cost of a ready made one. Now, if I can only find time to actually make one!

Like what you see? Please let me know! Support my blogging by becoming a follower.

Saturday, August 20, 2011

My Twiggy Chandelier for a Fraction of the Price!

O.k guys. I know ya'll have been wondering if I was just all talk about the dining room being redone...especially the chandelier, right? I'm not, I promise. I'm just not able to work on it full time, so it's a slow process. Hang in there with me, o.k? I'm taking it step by step. Rushing never produces anything as wonderful as what patience and diligence can.

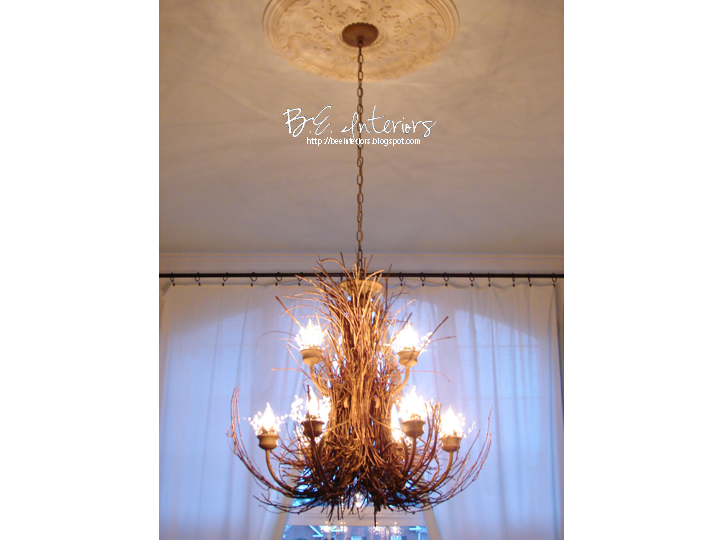
I've chalked off one more thing on the list: recreating a twiggy chandelier from my existing one! Wha-hoo! I've been a little nervous wondering if I could pull this off without it looking like a pile of kindling tied to the ceiling. The result is...exactly what I was after (thank goodness), and I LOVE it! My hubby thinks I have completely flipped my lid to put sticks on a perfectly good chandelier, but I love the after. When my sister-in-law walked in this evening, it was the first thing she saw and couldn't get over it being the old piece reworked. She thought it was gorgeous...which is exactly what I needed to hear - confirmation that it was worth the work.

Here's a look at my inspiration pieces again:

coral/twig chandelier
I wanted to go white, but the hubby would have REALLY flipped if I'd dared to paint
theexisting chandelier for fear I'd ruin it. If it had been hideous to begin with, it
would be a different story, but it wasn't.
This has become my inspiration room due to color and style similarity.
via Suzanne Kasler

Maybe the hubby will allow the white now that he sees it did turn out good!
via http://tartanscot.blogspot.com/
My study piece.

This is what it looked like to begin with:

It started like this.

Then I took the globes off to see what I could do with it.

Then I put the globes back on after repainting and liked it a little bit better, but still wanted to try the twiggy look. At least I knew if it didn't work, I was o.k. with the original now.

And now, the Pièce de résistance:


Ta-da!


The glass garland was an afterthought to add a little "juxtaposition" and sparkle.

I love the way the light plays through the crystals and twiggs.

I'm really liking the mix between the rustic twiggs and crystals. Fun!


How cool is that pattern on the ceiling?!


It's really not hard. Just takes time and lots of tweaking to get it just right. Total cost? Only $28 buckaroos! If you don't add the crystals, total cost is $0! Can't beat that. I still want to play around with adding some silicone light bulbs and may decide to extend the sockets out to look more like a candle. That's the thing about being a perfectionis: you never feel like it's good enough! Ugh! I do love the way it's turned out, though. Pleased as punch:)

I'm curious as to what you think. Drop me a note and let me know! I love hearing from my readers. Each morning I get up eager to check my email to see what you all have to say. There will be a tutorial coming for this if there is enough interest. I'm guessing...just from googling how to make one...that if you like it, you'll want to know how I made it. It's surprisingly easy, just takes patience. (In my best southern, hill-billy accent: "I'm gonna learn you some patience 'for it's all over with!")

Have a wonderful weekend...and take time to thank the good Lord Jesus for all he's blessed you with! I'm thankful for so much, but today I'm especially thankful for a creative mind and hands to make whatever comes into it:)


Sharing with:
Show and Share Day

HOG 
 
Photobucket

Tuesday, June 21, 2011

Gettin' Twiggy With it!

Corny, I know. Just couldn't help myself! I have fun with my post titles:)

You guys are just the best! I am so excited to be getting feedback from you all! Looks like we are narrowing it down. I think it's gonna be either B or D on the chandelier. I love both, but I'm leaning toward the twiggy one.
B.


coral/twig chandelier
via http://blinkdecor.com
Add some spray painted branches?

Want to know why? Here's my reasoning:

B or "Twiggy" is out of the ordinary. I can't stand to have a house that is cookie cutter. I like to mix it up. Getting creative and using things in unexpected ways is what makes design stand out [to me]. I like designing a house where it's classy and elegant, but not stuffy. The way to pull that off (in my opinion) is to mix it up some. When you pull in organic textures with traditional it softens the feel. Or, if you pull in the unexpected it makes it exciting and sometimes whimsical. That's what gets people's attention and makes them stop and really take in their surroundings versus just blowing through and not thinking much about it. Now at the same time, I don't to create a space that screams "I'm trying really hard...look at me!". The goal is to create the space that really grabs people, but at the same time they aren't really sure why...they just like it and want to stay there. It's gotta be subtle - not in your face. There needs to be elements that stand out, but not too much. Nice fine line, isn't it!? When an interior (or exterior) really works for me, it is usually not really obvious why at first. It's one I need to study. The difference is I want to stay there and take the time to figure out why.

Let's consider the room that I'm working with here.

What it looked like before we moved in, painted, replaced flooring, hung draperies, and put bead board inserts into wainscoting panels (betcha hadn't noticed that from the pictures - don't think you can really see it in these shots).

Current state (when I'm not dismantling a chandelier and sewing on the table) with that hideous color
I spontaneously slapped on the walls!

It seemed to stay a lot neater prior to the love seat getting stuck in there! Guess that's because it wasn't used much:)

So, although option A is very nice and elegant, it's a little ordinary and kind-of boring. C was just for fun to see what you all would say. I don't think I could actually bring myself to put that up unless it was an original and given to me! In that case, you betcha! Can't you imagine all the conversation that would come out of it round dinner?

D is gorgeous and very elegant. The only reason I'm leaning away from it is I want something that is unexpected. This is a rather traditional dining room and you'd expect to find a chandelier like this in it...and it would be beautiful! I think it'll be my backup plan if the twiggy doesn't work out...
which is always a very real possibility.

D.

via Ballard Designs

With the options narrowing down, I got on line and started hunting for all the twiggy chandelier images I could find (that I liked). The more I have to reference, the more likely I'll be able to pull this off. Here's some of the best I could find:


via Suzanne Kesler


Bingo!
via http://tartanscot.blogspot.com
 

via http://yelp.com/

twig chandelier
Why would you post a pic crooked like this?! Good image, though.
via http://vayzo.com/twig-chandelier

via http://ottawaathome.ca
Suzie:  Frank Roop. Here are the chairs again! ;)    Wood dining table, white faux bamboo ...
via http://decorpad.com
via http://bellacor.com
only $3,722.00!

via Deanna Wish Designs

So, as of now, I'm getting twiggy with it:) Boy, am I gonna get some looks from the hubby! But, he thought it was crazy to glue sticks to a mirror at first...until he saw it:) That's for another post, that I promise to put up one day soon.


p.s. While hunting for images, I stumbled across Neiman Marcus's Lighting page...who knew anyone went there for anything other than fashion?! Probably everyone but me, but regardless...talk about some gorgeous lighting options and ideas! Check it out for yourself at: http://www.neimanmarcus.com/store/catalog/templates/P6.jhtml?itemId=cat16990737&parentId=cat16990732&masterId=cat17640731&cmCat=&page=&view=
all&filter1Type=&filter1Value=&filter2Type=&filter2Value=&filterOverride=&sort=&navid=viewall
Follow Me on Pinterest