Monday, August 15, 2011

Amazing Silver Polishing Tip


via http://www.clars.com/

If you read my blog, you know one of the things I love to find at yard sales and thrift stores is old silver pieces. It's a southern girl thing...one Paula Deen talks about in her Savannah Style book that I just blogged a review of here. The only thing about silver is TARNISH! Now, sometimes I actually like the patina and wouldn't clean them if I had to. Other times, it is so bad it needs some help.

Silver Candelabras and crystal shakers found out "sailing".

Another thing you might have picked up on is that I try to avoid chemicals and harsh fumes. That is a result of getting a degree in Graphic Communications, which deals with the printing industry. I'll never forget reading an article in grad school about how women in that industry who had direct contact with all the chemicals had one of the highest rates of birth defects with children! Yikes! I haven't researched this, but I am nearly positive it's true just from my personal observance of all the "stuff" that has to be used in printing. That was enough to make sure I got a job on the other end of the spectrum dealing with the graphics, advertising and sourcing.

I digress. The reason for that statement is that one of the things I am leery of is household cleaners. Trouble is a lot of the "natural" solutions just won't cut the grime. So, when I googled "natural silver polish" I was not expecting anything like this to work, but thought I'd try anyway. Lesson learned! The first thing I found was this link: Natural Tarnish Removers. It's a recipe for electrolysis cleaning. Say what? Yep. A large pot of boiling water, baking soda, salt and aluminium foil - cleaning by electrolysis. Who knew?!


My "magic" stainless pot!

The crazy thing is IT WORKS! Check this out. Here's one of my pieces that has DESPERATELY needed cleaning:


One of my family pieces of silver "Before".

After! Amazing!

When I cleaned it, I just dumped a little baking soda on and some water to make a paste and lightly rubbed the detailed areas. Lastly, I washed with soap and water. No scrubbing involved! Is that not just the coolest thing ever?!

I will caution you, though. I put this gorgeous piece in [that I found out treasure hunting and LOVE] that was made in Boston in 1925.


"Before"
I either let it go too long or it was in rough shape, because the silver literally just peeled off the lid and handle.


"After"

See what happened to the handle and lid?
I thought I might just cry, but I was only out $2 so I just sucked it up. Oh, well. So, my caution is this:

Don't do this with pieces that are really scuffed up. I think it must let the water get under the silver which causes it just to lift off. I'm guessing here. Be careful how long you let a piece boil, as well. This creamer pot was in there for about 15 minutes because it was so tarnished. Too long, apparently. The water can only handle a few pieces that are badly tarnished before it has to be changed out. The aluminum foil on the bottom begins to disintegrate. If you look in the boiling pot picture you can see a mixture of the disintegrating foil and silver leaf that is floating on the top. Oops!

Overall, this is a fantastic way to polish pieces in good shape. Just don't go too long without pulling them out to check on the status. If stuff starts floating....STOP! Happy polishing!


Saturday, August 13, 2011

Skinny Dresser Reveal and Chalk Paint Review

Alrighty. Ready to see what I did with my first try out the gate with chalk paint?

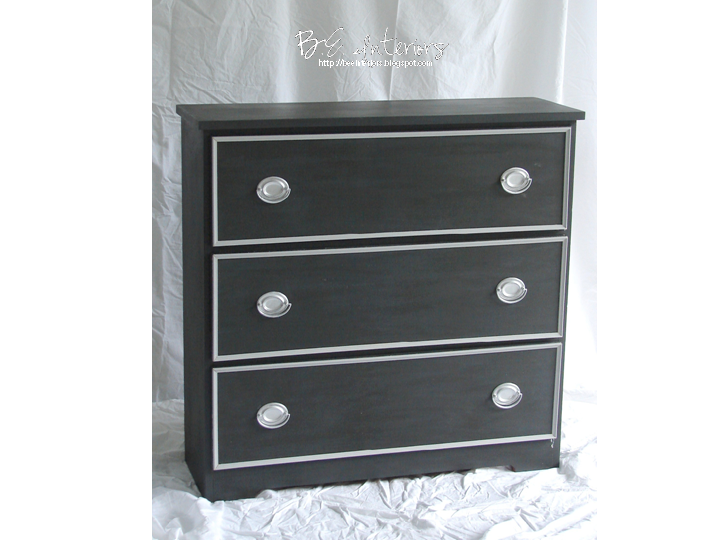
Meet Little Skinny after her makeover!

Excuse the lint! I was in such a rush to capture the light for the photo that I didn't even notice it.
Amazing! She went from country bumpkin to glamour lady. See what she looked like before when I found her all alone in the thrift store?

Looking a little blah.
Decided to take a few more "Before" pictures after I'd started on the top. Oops!


Doesn't it she look SOOOO much better?! She was slathered in Annie Sloan's Graphite outside and Paris Gray Chalk Paint on the inside of the drawers. Then she got a solid wax job in leftover Minwax clear. The outside was lightly brushed with Annie Sloan's Dark Wax to deepen the color. Trim detail was added to the drawers. I simply bought three 8' pieces of detail moulding at Lowe's for about $3.50 each, painted them Paris Gray, cut with a miter box and then Liquid Nailed them to the drawer fronts. A little silver Rub-n-Buff on the pulls and wha-la! What cha' think?

The Graphite paint is actually a dark gray...not black as I thought, but I still love it.
I got ready to do my little "After" photo shoot and decided I didn't like it staged. I love the clean lines of this piece now. It sure would look purdy sittin' in my foyer, but it'll go to the booth because I really need a new camera and computer more than a little dresser to smile at now and then.

Like the insides painted Paris Gray? It's a gorgeous blue gray.

Chalk Paint Review
Now, about that chalk paint. Like I said before, it ROCKS! Here's my full take on it:

Pros:
No sanding or priming needed!
Provided you don't go too thick, the brush strokes dissolve into a nice flat finish.
Paint is super creamy and thick. I can be watered down to get a thinner version.
Easy soap and water clean up.


Cons:
It did take two coats in order to keep from having the dresser show through for a clean look like this, but I didn't put them on too thick as I didn't want brush strokes. If you went thick, that probably not be the case. If you are going for rustic, definitely only need one.
Does have fumes, although not too bad.
Pricey and has to be ordered most of the time as stockists are few and far between right now, here in the U.S.

Will I continue to use it? Yes, but it has it's place. If you're going for a distressed look or have a piece in good shape, it's your ticket to make the job twice as fast and easy. The absolute best characteristic of this paint is the time saving factor of no sanding or priming and that it can go over just about any surface and stick! (Should I say that again, just for emphasis?)

When you consider that you don't have to buy primer, the price isn't so bad. You're really not paying much more than you would if you had to buy primer as well. My biggest disappointment was that there were fumes. I was really hoping it would be more like milk paint in that regard, but they weren't bad enough to make me not use it again.

In my opinion, this is best suited for an aged, layered or distressed look. If you are aiming for clean lined and more modern I'd probably save the money and use latex or oil...especially if you have to repair and prime anyway. I say that a little tongue in cheek because if latex is used, be very careful how you prep and finish in order for it to stick properly...especially on drawers!

Well, there you go. My take on Annie Sloan's Chalk Paint and my first use of it. I've already got the second piece set up to go so it'll make it's appearance in blog land next week if all goes well!


 p.s. Can I just tell you how hard it is to type a complete thought around here at night (or anytime during the day for that matter?!). Please bear with any incomplete sentences or misspelled words. I must get interrupted 10 million times while typing. UGH!

Friday, August 12, 2011

Chalk Paint Update

I'm saving a review of the chalk paint until I am totally done, but I have this to say so far:

HOLY COW! This stuff ROCKS!
Can I just say how great it is not to sand and prime?! Boo Ya!

I worked all day on painting a piece so I can have it to show to you tomorrow.


My little guys art work.

In the meantime, I want to share what my little guy painted today! I truly treasure my boys artwork, and this is the first piece he's ever done where there was really a lot of thought that went into it. I sat and helped him get paint and thoroughly enjoyed watching as he methodically placed and brushed his colors. I have tons of art from my two older boys, but this is little guy's first real painting. It's now one of my most treasured pieces:)


Wednesday, August 10, 2011

Got Chalk Paint?


via The Mommy Diaries blog

Guess what I did today? I got me some chalk paint! I'm such a nerd when it comes to paint. Do you think I could stop at one quart? Oh, no. I had to go and get three AND some wax for my first run. Tells you how much I trust ya'll with all your raving reviews:) I am itching to go pry off a lid and slap some on something...anything! I'm trying to keep myself in check and get my dresser appropriately prepped first. But, that is the great thing about this stuff (supposedly) is that you don't have to do any of that prep stuff other than wash or wipe down an item. Do you have ANY idea what that means as far as speed on pieces? Hold on to your hats! Pieces may just start flying out of my garage workshop, which I really need. I've felt a bit like molasses this summer and I'm ready to start cranking again.

So who's in the line of fire? Little Skinny dresser...that's who. She's going black (graphite) and I can't wait!

+Annie Sloan Chalk Paint Graphite =

I'm off to change into my work clothes and open a can of paint. Cheerio!

Tuesday, August 9, 2011

Caution: Dining Room in Progress!

Warning: This post is just kind-of all over the place...kind of like the evening news...with updates.

No, this is NOT my dining room OR my laundry room, but it has me completely inspired that an open hall concept could work for my one day laundry reno!

I just gotta share something from my personal life, which I try and leave out of blogging for the most part. This summer I haven't accomplished one of my big goals - redoing my laundry room. The main reason was little bro, who was supposed to come up and help take out THE wall, went and got himself a really good job...as a passenger pilot for Delta and is now based out of Detroit. That's just a little far away for a "weekend reno". Go little bro! I'm incredibly proud of him (although terrified at the same time!). I think I can forgive having to wait on the laundry redo for that:)

My little brother...who towers over me...seriously by about a foot!
Can I just tell you how surreal it is to see the kid you remember in diapers dressed like this?!
So, what about my other projects in the works? Did you think I'd forgotten about my dining room? Nope, it just had to wait a little while for vacation and for me to get some pieces down to the booth. Now, I'm hitting it hard this week to knock out painting the walls. I did manage to score some great fabric for the new curtains since the original fabric I'd planned to use was just a yard or two short and have gotten them temporarily hung. I'm really restraining myself with this room and keeping it simple and fairly neutral. What do you think?


The pattern is very subtle.


The material is a soft green with a very slight shimmer. It has a very subtle various size kinda' mod daisy shape pattern in various shades of gold, super pale blue, and cream. It continues the green that is in the family room and kitchen but only in the fabric. That way it's not overwhelming. The pale blue ties in the ceiling and blue accents in the other adjoining rooms. Gotta love open floor plans and having to tie it all together!

New ceiling color. I'm loving this!

I'm planning to do some small accents in this lovely coppery-orange shantung throughout all three adjoining spaces to add warmth and liven them up a little:


Kay Unger dress via http://www.bluefly.com/
These three rooms use the amount of orange I'm looking to incorporate and are serving inspiration right now.

via Verdigris Vie


via House of Turquoise

via Suzanne Kesler


I'm really torn with this room on what to do with those walls. I'm dying to put some blue on the walls, but I'm trying hard to keep it fairly neutral. So, I've decided to go with a dragging technique in a slightly darker creamy pearl metallic over the base of creamy white already up there. That way, I shouldn't have to repaint...possibly ever (right!) - just change out accessories. Although this example is green, this is the look I'm going for. Imagine a pearlescent cream over white:

Dragging Paint Method

Dragging Paint Technique

Step 1. Before you begin, carefully tape off all areas where you do not want to apply the finish. Apply Valspar base coat to the entire surface with a roller. Remove tape. Allow to dry overnight.
Step 2. Reapply tape. Apply selected glaze with a roller. Work in wall sections no wider than 4-6 ft. at a time so the glaze does not dry too quickly. Maintain a wet edge from section to section to prevent lap marks. Only stop at the end of a wall.
Step 3. Using a dragging brush and holding bristles parallel to surface, drag the brush down through the wet glaze. Work from top to bottom, holding the bristles of the brush against surface with handle tilted slightly toward you. This keeps the bristles rigid, creating the streaked look. Wipe excess glaze from the brush after each downward pass to ensure a dry brushing surface. Remove tape within an hour and allow to dry.

Just thought I'd throw the directions in there for fun. We'll see if I have any tips to add when I get done!
I've also been collecting branches to play with the chandelier transformation when time permits, and the slipcovers are still in process. This room is not a top priority right now so I have to just take it bits at a time. Sometimes I feel like such a yo-yo because I have to bounce between home decor updates and keeping up my booth with furniture redos. I'm dying to finally pull it all together because when school starts up, the kitchen is next in the line of attack!

Although not planned, the room has suddenly begun to remind me a lot of this room!
via Suzanne Kesler
Last, but not least, I am trying to narrow down rug options. I love seagrass and have that in my family room...which is open to the dining room. I've contemplated that again, but don't think I want that under a table with kids. I may look for a carpet remnant at the carpet place (hubby's high school friend owns it!). I've also contemplated doing the carpet tiles from FLOR. I love those, just not sure I want to pay that much. This is one of times when I realize I'll get what I pay for, so I'll probably not skimp too much. It's gotta last. The more I look, the more likely I'll get an indoor/outdoor carpet like one of these. Lot's of wear in this room...even if it's not usually dining (kids, dog, me...you name it!):

Lyrical by Home Decorators Collection
I'm in love with this but wonder if I'd tire of it quickly. I does a great job of tying the ceiling, walls, furniture and drapes together, though! I didn't realize just HOW good until I was putting together this post and saw the pics side-by-side!


Home and Porch - Turner Creek - Linen
via Outdoor Rugs Only
Kaleen - Turner Creek - linen

Ideally, I can find one at an estate sale. I let one go not too long ago that I should have snapped up that would have been perfect! Ugh! Why do I do that?! Were only talking a difference of SEVERAL HUNDRED dollars!
Follow Me on Pinterest