Showing posts with label Reveals. Show all posts

Saturday, August 13, 2011

Skinny Dresser Reveal and Chalk Paint Review

Alrighty. Ready to see what I did with my first try out the gate with chalk paint?

Meet Little Skinny after her makeover!

Excuse the lint! I was in such a rush to capture the light for the photo that I didn't even notice it.
Amazing! She went from country bumpkin to glamour lady. See what she looked like before when I found her all alone in the thrift store?

Looking a little blah.
Decided to take a few more "Before" pictures after I'd started on the top. Oops!


Doesn't it she look SOOOO much better?! She was slathered in Annie Sloan's Graphite outside and Paris Gray Chalk Paint on the inside of the drawers. Then she got a solid wax job in leftover Minwax clear. The outside was lightly brushed with Annie Sloan's Dark Wax to deepen the color. Trim detail was added to the drawers. I simply bought three 8' pieces of detail moulding at Lowe's for about $3.50 each, painted them Paris Gray, cut with a miter box and then Liquid Nailed them to the drawer fronts. A little silver Rub-n-Buff on the pulls and wha-la! What cha' think?
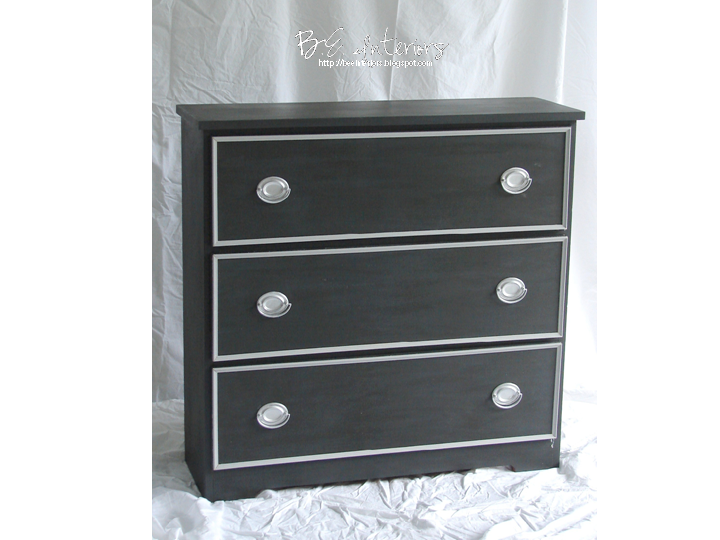
The Graphite paint is actually a dark gray...not black as I thought, but I still love it.
I got ready to do my little "After" photo shoot and decided I didn't like it staged. I love the clean lines of this piece now. It sure would look purdy sittin' in my foyer, but it'll go to the booth because I really need a new camera and computer more than a little dresser to smile at now and then.

Like the insides painted Paris Gray? It's a gorgeous blue gray.

Chalk Paint Review
Now, about that chalk paint. Like I said before, it ROCKS! Here's my full take on it:

Pros:
No sanding or priming needed!
Provided you don't go too thick, the brush strokes dissolve into a nice flat finish.
Paint is super creamy and thick. I can be watered down to get a thinner version.
Easy soap and water clean up.


Cons:
It did take two coats in order to keep from having the dresser show through for a clean look like this, but I didn't put them on too thick as I didn't want brush strokes. If you went thick, that probably not be the case. If you are going for rustic, definitely only need one.
Does have fumes, although not too bad.
Pricey and has to be ordered most of the time as stockists are few and far between right now, here in the U.S.

Will I continue to use it? Yes, but it has it's place. If you're going for a distressed look or have a piece in good shape, it's your ticket to make the job twice as fast and easy. The absolute best characteristic of this paint is the time saving factor of no sanding or priming and that it can go over just about any surface and stick! (Should I say that again, just for emphasis?)

When you consider that you don't have to buy primer, the price isn't so bad. You're really not paying much more than you would if you had to buy primer as well. My biggest disappointment was that there were fumes. I was really hoping it would be more like milk paint in that regard, but they weren't bad enough to make me not use it again.

In my opinion, this is best suited for an aged, layered or distressed look. If you are aiming for clean lined and more modern I'd probably save the money and use latex or oil...especially if you have to repair and prime anyway. I say that a little tongue in cheek because if latex is used, be very careful how you prep and finish in order for it to stick properly...especially on drawers!

Well, there you go. My take on Annie Sloan's Chalk Paint and my first use of it. I've already got the second piece set up to go so it'll make it's appearance in blog land next week if all goes well!


 p.s. Can I just tell you how hard it is to type a complete thought around here at night (or anytime during the day for that matter?!). Please bear with any incomplete sentences or misspelled words. I must get interrupted 10 million times while typing. UGH!

Friday, August 5, 2011

School Desk Reveal

♪"Schoooool's (still) .....out.. for.. the summer...",

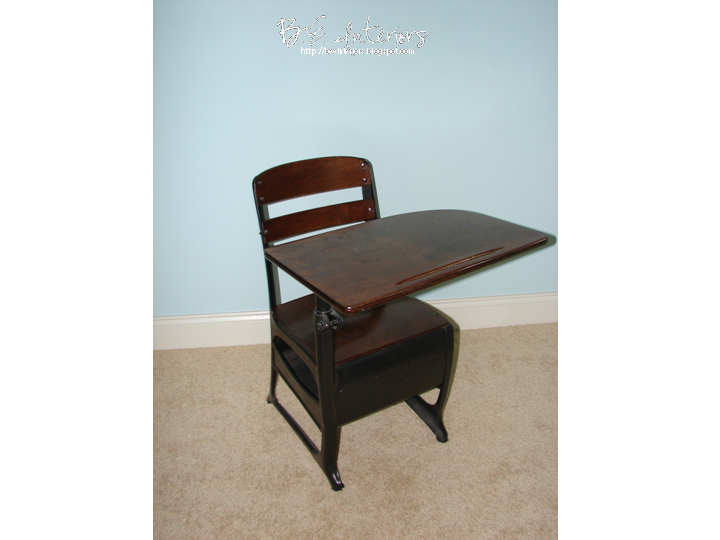
but I'm working on a school desk! Go figure:) Actually I just finished up this little school desk I found out yard sailing not too long ago. It was in really good shape.  I immediately grabbed it as there are a ton of home schoolers around here who'd probably love to get their hands on one. Let's just hope it's a boy who likes racing stripes!


Would you believe I forgot to take a true "Before" picture?! UGH! Sometimes I get ahead of myself and jump on a project before getting my ducks in a row. I'm sure none of you ever do that:) I remembered after I'd slapped on some Zinser Bin Primer.


It was all this color wood. I at least remembered to take pictures before getting primer on all of it! 

First, I lightly sanded the whole thing, then masked off the wood. Krylon's Oil Rubbed Bronze spray paint was applied to the metal and allowed to dry. Then, the desk was coated in primer.


After appling a coat of Sherwin Williams "Rice Grain".

After applying stripes prior to sanding, staining and waxing.

Nice and neat stripes that I was about to rough up and stain. That part always pains me, but I love the after.
A layer of SW Rice Grain in satin was applied (that I found at the Habitat ReStore - a whole gallon for about $5!), some stripes were masked out with my favorite painters tape - Scotch Blue Delicate, a thin layer of sealant brushed on to make double sure of no leakage under the tape, and then navy stripes were painted in BM Midnight Blue. Lastly I re-taped the red stripe, sealed and applied some red acrylic paint. After it was all dry, I wiped on a layer of Minwax Dark Walnut stain to age it, then applied Minwax clear wax. Done! Sounds quicker than it actually was! I love how the stain, sanding and wax gave it a well worn and loved look.


Now it looks loved and worn from time (wink, wink).


Nice and lightly worn.

The finished product which is now in the booth.

Funny thing is my first refinishing/repair project was a little desk just like this several years ago and now sits in the boys room and has gotten TONS of use as both a homework and art spot as well as a timeout chair:)

This was my first little desk and refurbish job that put the bug in my blood:)

And lastly, I guess I'll spill the beans on the current big project, like you've not already guessed it...the love seat shown in it's before stages here:

I'll be as excited as anyone to see the finished redo on this baby!

I've pulled so many staples today that I have blisters forming on my hands and a crick in my back from leaning over. I have a whole new appreciation for upholsters! They earn EVERY single penny they charge and must have the patience of Job! Once I FINALLY get all those staples out, it should be quick work (please no surprises!).


Thursday, July 14, 2011

Chinoiserie Mirror Reveal

I have a new reveal!

Hello, Chinoiserie!

It's this gorgeous chinoiserie mirror I found while thrifting a while back:


Before as just wood and heavy as LEAD! See that bottom left corner? That would be the biggest reason for painting it.

It took me all of about 5 seconds to run up and grab the tape with the price on it after I saw it. I loved the fretwork and pagoda style top, as well as the beveled edges of the mirror inside the frame. Let's just say something like this would retail for a pretty penny! I backed the car up to the back, the guys loaded it for me and off it went...for a makeover. I knew what color to use, BM Palladian Blue, but once I got it on there, I wasn't really happy.  Something was missing.

Pretty, but looking a little Plain Jane.


It just wasn't right. I couldn't put my finger on it. So, it went on the back burner for a little while until I could figure out what it needed. A couple of times I started to just completely change the color, but the time and effort that had gone into working around that mirror and the layers of gloss held me back. Then... I found this image on one of the blogs I like to read, Maison Decor, and suddenly I was inspired!


Florentine Tray via Maison Decor

Out came the bright red paint (just a dab), some gold and antique gold Rub -n- Buff, a little brown shoe polish (didn't have any dark wax!), and some clear wax. Wha-la! Just what it needed.


Funny thing is, I'm generally not a fan of gold. It's just a little too flashy for me, and...if I'd been painting this for a specific space, it could very well have stayed just the glossy Palladian Blue. It makes it more modern. But, I'm painting it to sell and needed a little "umph". Each piece has to be looked as an individual and what will work for that piece and/or the space it's going into. If you want me to sound silly, you have to "listen to what the piece is asking for". Sound goofy enough? It's true, though. Each piece is different and has different design needs. It's like makeup. You gotta get the right colors and shades for your individual coloring or you look terrible. One formula does NOT fit all. This piece needed a little bling and a touch of color to pop and appeal to the largest range of buyers. Now I love it...and it's in the stack of stuff going to the shop on Thursday.


Linking up with:

Photobucket

grabtt

Domestically Speaking


Mustard Seed Creations Furniture Feature Friday


Feathered Nest Friday
Follow Me on Pinterest