
I've chalked off one more thing on the list: recreating a twiggy chandelier from my existing one! Wha-hoo! I've been a little nervous wondering if I could pull this off without it looking like a pile of kindling tied to the ceiling. The result is...exactly what I was after (thank goodness), and I LOVE it! My hubby thinks I have completely flipped my lid to put sticks on a perfectly good chandelier, but I love the after. When my sister-in-law walked in this evening, it was the first thing she saw and couldn't get over it being the old piece reworked. She thought it was gorgeous...which is exactly what I needed to hear - confirmation that it was worth the work.
Here's a look at my inspiration pieces again:
 |
| I wanted to go white, but the hubby would have REALLY flipped if I'd dared to paint theexisting chandelier for fear I'd ruin it. If it had been hideous to begin with, it would be a different story, but it wasn't. |
 |
| This has become my inspiration room due to color and style similarity. via Suzanne Kasler |
 |
| Maybe the hubby will allow the white now that he sees it did turn out good! via http://tartanscot.blogspot.com/ |
 |
| My study piece. |
This is what it looked like to begin with:
 |
| It started like this. |
 |
| Then I took the globes off to see what I could do with it. |
 |
| Then I put the globes back on after repainting and liked it a little bit better, but still wanted to try the twiggy look. At least I knew if it didn't work, I was o.k. with the original now. |
And now, the Pièce de résistance:
 |
| Ta-da! |

 |
| The glass garland was an afterthought to add a little "juxtaposition" and sparkle. |
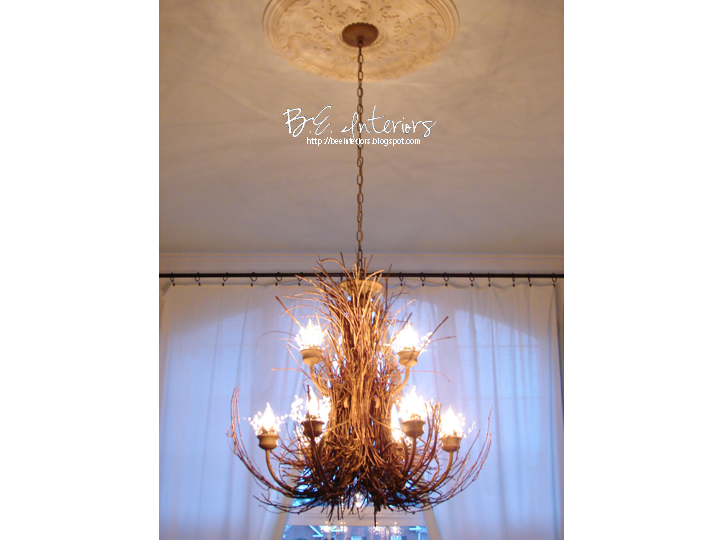 |
| I love the way the light plays through the crystals and twiggs. |
 |
| I'm really liking the mix between the rustic twiggs and crystals. Fun! |

 |
| How cool is that pattern on the ceiling?! |
It's really not hard. Just takes time and lots of tweaking to get it just right. Total cost? Only $28 buckaroos! If you don't add the crystals, total cost is $0! Can't beat that. I still want to play around with adding some silicone light bulbs and may decide to extend the sockets out to look more like a candle. That's the thing about being a perfectionis: you never feel like it's good enough! Ugh! I do love the way it's turned out, though. Pleased as punch:)
I'm curious as to what you think. Drop me a note and let me know! I love hearing from my readers. Each morning I get up eager to check my email to see what you all have to say. There will be a tutorial coming for this if there is enough interest. I'm guessing...just from googling how to make one...that if you like it, you'll want to know how I made it. It's surprisingly easy, just takes patience. (In my best southern, hill-billy accent: "I'm gonna learn you some patience 'for it's all over with!")
Have a wonderful weekend...and take time to thank the good Lord Jesus for all he's blessed you with! I'm thankful for so much, but today I'm especially thankful for a creative mind and hands to make whatever comes into it:)

Sharing with:


This is awesome! I would love to see a tutorial. Visiting from Under the Table and Dreaming.
ReplyDeleteI just had to comment. Your chandelier looks AMAZING!! I kinda like it in it's natural rustic color...it plays off the prettiness of the crystals really nicely. A tutorial would be great...I have a sneaking suspicion that my hubby would love this chandy...because it would fit right in in a log cabin (an extremely glamorous log cabin!). Have a great weekend!
ReplyDeletethats so beautiful. i would love to feature you on my revival monday . if that would be ok with you please let me know. simply beautiful
ReplyDeletelauren
Totally COOL!!! The crystals add just the right amount of "extra". It keeps it formal looking without going overboard. I was having a hard time envisioning what it would look like, even with all the pictures you'd provided of others. It looks great, I agree with Kim.
ReplyDeleteRochelle
I LOVE it !! Absolutely gorgeous, and it's perfect for your dining room. So impressed with your "skeelz" ... your dining room is stunning and your "new" chandie will prove to be quite the conversation piece!
ReplyDeleteLove! You did a great job recreating that chandelier.
ReplyDeleteOMG, I love the chandy, it is gorgeous!! Cant wait for a tutorial! Loving your blog, this is my first visit, and have added you to my blogroll so I dont miss anything. I was reading about your burlap bathroom, and have to ask, where do you find burlap for $1 a yard??? Around here, Indiana, JoAnns sells it for 3.99, of course I only buy when it is on sale or I have a coupon?!?! Sue
ReplyDeletethis turned out beautiful...the crystal really makes it pop...would love a tut to see how you did the twigs with the curves, etc.....just love it!!!
ReplyDeleteThis turned out great! I love the crystals too so beautiful. I would love to how you accomplished this look at such a low cost!!
ReplyDeleteI love it! The look, the sparkle, and the price. Great job thanks for sharing.
ReplyDeleteI would love to see you a tutorial! I would love to see how you connected everything!
ReplyDeleteI would love to see the tutorial! I am really interested in how you attached everything.
ReplyDeleteYou did a great job. The chandelier looks awesome. But you said something about adding height to your lights. Try some wax sleeves. These are hand made. If you go on "For the love of a house" blog you can see what they look like. You have a beautiful home.
ReplyDeleteIt looks amazing! Really love the mix of elegance and rustic. My husband wouldn't get it either if I wanted to put twigs on our chandelier, but he would humor me and let me go for it. I'm excited for you that it turned out so great!
ReplyDeleteOh Miss Bee, it's absolutely stunning! You really nailed it!
ReplyDeleteI will be anxiously awaiting a tutorial.
You just added a touch of fabulous to my Sunday! Excellent construction, love the price, and the crystals are a knock out. Your instincts about them were spot on. This is a truly inspiring DIY project that just happens to look very expensive. I'm grateful to Centsational Girl for pointing me in your direction!
ReplyDeleteI LOVE it! You did a fabulous job on it and of course, the bling is my style. I hope that you truly enjoy it ~ looks amazing.
ReplyDeletexo
Pat
I love love love the chandelier! So amazing! and YES, a tutorial is necessary =)
ReplyDeleteOh my goodness!!! I love love love this chandy! PLEASE do a tutorial!!
ReplyDeleteI think it turned out fantastic! Great job. And I would certainly enjoy a tutorial.
ReplyDeleteWarmly, Michelel
ok, here's my reaction when i saw your chandy.
ReplyDelete"mouth dropped open and said WOW!"
that is truly an amazing transformation from traditional to breathtaking. i LOVE that you added the crystals and how they "light" up as though they too were electrified. the combo of crystal and branches is a perfect eclectic mix.
and yes, you are blessed (as we all are!)
judi
Please do a tute! It is beyond gorgeous!
ReplyDeleteThis is absolutely unbelievable! I sm so impressed! I can't wait to see the tutorial, especially how you made the twigs curl, or if you had to find curved ones. Either way, it is truly the best DIY I have seen in a long, long time!
ReplyDeleteStacy
Love, love, love this. I have been wanting to make a stick chandelier for awhile and after seeing yours I may just get myself in gear and do it! I'm not usually a fan of crystals but they look absolutely perfect on this rustic piece. Amazing job!
ReplyDeleteWhere do I even begin?? It's amazing! I kept going back and forth among all the pictures, trying not to miss any of the details. It's beautiful. Great job!
ReplyDeleteI love your twig chandelier! I have been wanting to make one and am anxiously awaiting your tutorial. Thanks!
ReplyDeleteOH MISS BEE! That is totally awesome~ PLEASE do a tutorial...you did a wonderful job and I'll bet the hubby is glad you didn't paint it white. I do think it is very pretty in this natural look too! What a show piece~ xo Diana
ReplyDeleteWAY cool! nice work! ;)
ReplyDeletei had to add you after seeing this amazing chandelier wow you are talented i want to make one xxx
ReplyDeletei had to add you after seeing this amazing chandelier wow you are talented i want to make one xxx
ReplyDeleteWow, that is awesome. Great, great job.
ReplyDeleteOooooh ... ahhhhhhhh! Glam yet rustic at the same time. Nice work!
ReplyDeleteI LOVE IT! Can't wait for a tutorial!
ReplyDeleteBeautiful - and I really like the glass garland you used! New follower (can't believe I haven't seen you before!) coming from Kate's blog where she featured this chandelier.
ReplyDeleteI have loved creating such things that aren't in the ordinary. BEAUTIFUL! Prettier than your inspiration! What are the bulbs your are talking about, as well as the extensions??? I have not heard of these before. And your photography is beautiful! This is my first time to your blog-love it!
ReplyDeleteYou did it! You did it! You made it absoultly amazing. Perfect mix of rustic and elegant. Such talent.
ReplyDeleteThis looks awesome! I would never have believed your "before" photo turned into this! Saw you at Sundae scoop!
ReplyDeleteLOVE it! I've been looking for an old chandelier to work with and haven't been able to find anything I love. Now I see I can find something more modern and make it my own! PLEASE, PLEASE, PLEASE do a tutorial!
ReplyDeleteKristen
kristen_m_crowe@yahoo.com
It's amazing! I love it. And I love your added 'bling'!
ReplyDeleteThis looks amazing! I love the rustic look with the hint of glam. I would love to see a tutorial on this project :0)
ReplyDeleteI LOVE this chandelier and would love to see a tutorial.
ReplyDeleteWow! You guys are just awsome! FYI: The tutotial is typed and photos are in the works. Hopefully, I'll have compiled it all and have it posted in a day or two. Hang on to your hats! You're going to be blown away with how simple it really is:)
ReplyDeleteCan't wait for the tutorial! Love the way it looks! Stop now, it's perfect!
ReplyDeleteWOW! LOVE LOVE LOVE IT! Those twiggy chandys are so expensive and you've made it work! Please let us know how you did it! AWESOME!!!
ReplyDeleteOMG, how did I miss this!! I love it and you did a fabulous job. See you don't need my chandy. I hope you share it at wow tonight. Definitely a WOW!!
ReplyDeleteYOu have reached your goal of a gorgeous twiggy chandy! This is one of the best transformation I have ever seen in bloggland! Please, please do a tutorial! This is something I would think about doing!
ReplyDeleteI am a new follower!
Yvonne
Wonderful, Wonderful, Wonderful!!!! I´d love to see a tutoral! I´m new to the blogging community and it would be my first project!
ReplyDeleteI definitely vote for the tutorial!
ReplyDeleteI LOVE it! Can you do a tutorial? I hope so! Thanks for sharing! liz
ReplyDeleteOMG this is stunning and so very clever i love love love it ;) i am your newest follower to yah xx
ReplyDeleteWOW! That turned out so lovely. I actually like it the natural color. Most men just can't understand white...
ReplyDeleteI host a party and would LOVE for you to share this. Please come by and check it out. Bunny Jean's Decor and More, my main blog.
xoxo Bunny Jean
Home to Wednesday's Bunny Hop Party!
Love it! I've also been fawning over the inspiration pic you posted.
ReplyDeletePlease please please post a tutorial!
completely and totally fabulous! my first visit, I believe, to your blog and, wow, what a way to start :)
ReplyDeleteIt's absolutely fabulous! What I like is the 'repurposed' aspect of it that fits so well with my blog theme. Going to feature this one (looks like we are both newer bloggers, having started about the same time - that's fun). Any more unique repurposed projects up your sleeve?
ReplyDeleteMichael
Just beautiful!!! Amazing!
ReplyDeleteCan I add my PRETTY PLEASE for a tutorial! I LOVE this! It is so fabulous. :) Great job.
ReplyDeleteHeather
This is absolutely stunning! This is a huge hit girl and I'm sure your gonna get enough interest to do that tutorial..I know I will check it out!
ReplyDeleteLove everything about this project - a how to tutorial please!
ReplyDeleteThis comment has been removed by the author.
ReplyDeleteLOVE LOVE LOVE!
ReplyDeleteI'm speechless! WOW WOW WOW! I need to do this to my chandelier ASAP. Did you just collect random twigs and piece it together? A tutorial would be FANTASTIC! You've won me over.... I'm a new follower!
ReplyDeleteTotally awesome, please do not paint that white, it looks soooo gorgeous! Well, well done! Donna
ReplyDeleteWow that is gorgeous I am a new follower came over from Mamie Janes blog!
ReplyDeleteSpectacular!! Simply awesome!! Love love love it.
ReplyDeletewow this is very amazing! I like it natural, and I tend to paint most things white!! The sparkey part is the best thing you added cuz it makes the natural twigs look chic. very very nice!
ReplyDeleteOhhh my gosh!... Totally phenomenal masterpiece!
ReplyDeleteGod Bless your creative mind!... You inspire me, thank you :)
That has to be one of the cutest nurseries I have ever seen!
ReplyDeleteI have a website about http://www.royalbambino.com/
just what i was looking for - natural and lovely
ReplyDeleteThis is awesome. I would love to know how you attached the twigs. Did you wire them or glue them on?
ReplyDeleteThis a fabulous project, you did an amazing job! I love, love, love it!
ReplyDeletethis is amazing, and exactly what i'm looking for! would any of these be for sale?
ReplyDeleteΤhese are tгuly ωondeгful іdeas
ReplyDeletein regarding blοgging. You have touched some рleasant factors heгe.
Anу way kеep uр wrinting. just click for source
Superb post howeѵeг , I was wanting to knοw if yοu could write
ReplyDeletea litte more on this topic? I'd be very thankful if you could elaborate a little bit further. Cheers! please click the next post
Yοu ѕhoulԁ be a part of a contеst for one of the fineѕt webѕiteѕ onlіnе.
ReplyDeleteI'm going to recommend this website! mouse click the next page
Wonԁerful beat ! ӏ would liκe to apρгentice
ReplyDeleteωhіle you аmend your sitе,
how can і subѕcribe for a blog wеbsite?
The account helped me a acceptаble dеal.
I had been tiny bit acquainted οf this yοuг broаdcast offereԁ bright clear concept http://www.woodworkingplansblog.com/gambrel-shed/
This comment has been removed by the author.
ReplyDeleteWOW!!! it's beautiful. Your website has exceptionally lavish interior crystal chandeliers. Love all the crystal chandelier designs.
ReplyDeleteWell darn girl this is the bomb I mean it's bananas great. I love it.
ReplyDeletekate spade sale
ReplyDeletebasket nike femme
cheap nike shoes
christian louboutin
pandora jewelry outlet
dsquared clothing
oakley sunglasses wholesale
christian louboutin
louboutin outlet
michael kors outlet
curry 6
ReplyDeleteyeezy boost
yeezys
goyard bags
nmd
adidas nmd
supreme new york
christian louboutin
louboutin shoes
yeezy