 |
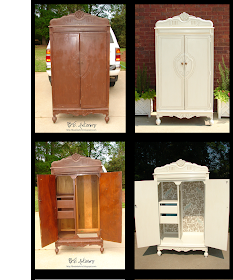
| "The Baroness" Before and After B.E. Interiors Photography |
Everyone has their own way of doing things, but I though it might be fun for you to see what goes on when I'm looking for a piece and what happens when I go through the brainstorming/design phase of recreating a piece of furniture. So many people have really seemed to like my "Baroness" armoire piece...especially the inside. I have a sneaky feeling people would love to know how in the world I come up with that kind of thing. O.k. maybe not. Maybe I'm just flattering myself, so humor me;)
The process actually begins before I even buy. In order for a piece to have potential, I'm looking for a couple of things... although I'm not actually running through a check list in my head:
- Over-all condition. Is it in good or easily repairable shape? By that, I mean would a little screw tightening, wood putty, sanding, stain and paint save it? If not, keep walking.
- Style. I rarely go out looking for something specific. I try to keep a finger on what appeals to people currently and if I see something with a vein of those same aesthetics (because everything recycles in style) for a good price, I grab it.
- Solid wood. No MDF or pressboard here! It's resale value isn't going to be much if it's not solid and it's definitely not going to be worth any real work.
- As distasteful as the subject is, these days you have to really look out for little critters on resale pieces. So, I carefully check it over with a tiny LED (bright!) flashlight I carry on my keys. Do a little research to know what you're looking for. I'll leave it at that!
- No cigarette smoke! Zinser Bin will cover it, but it's a ton of work and reeks on the way home, leaving a horrid smell in the car. It'd have to be one heck of a beauty to make me buy it!
- Detailing. There needs to be some kind of detail that makes it catch my attention...or if it's a minimalist piece...lack of detail which also opens doors to creativity.
- Price. I will rarely pay more than $100 for something unless it's in fantastic shape.You have to keep your finger on what a piece will retail for and how much you've got to put into it. Will it make money or is it a piece you really love?
- Is it country, modern or elegant antique? What kind of finish would compliment that style best?
- What element do I want to be the main feature?
- I shop for some remnant fabric (or use some of my stash) that goes really well with the style of the piece, figure out how I'm going to use it and then draw colors from it.
- I then decide which colors would look best with the style of the piece and where would I use each. I usually pull three colors: overall, glaze or stain, and possible accent color.
 |
| My latest makeover "victim"! |
When I look at this armoire, I see fairly clean lines. That means nothing flashy or too ornate will work. I've wanted to use chalk paint again and this is a great piece for that. It needs very minor repairs...just some wood filler, sanding and stain on those places to keep the base a uniform color. I don't have to strip this one if I go with an aged look.
 |
| See how the bottom of this veneer is waving and separated from the base? This needs to be fixed or it will easily catch and tear on something making for one unhappy customer...NOT what I'm after! |
I know this piece was originally bought by a man for his personal use, so it's clean lines would likely appeal to men more than some other piece (Ms. Baroness!). That means, don't get frilly. The great thing about not overly masculine pieces is that they also appeal to a lot of women, so don't go TOO masculine either.
Sometimes the initial force directing where I go with the process is just my desire to do a certain look, finish or use a certain fabric. I was wanting to do an aged driftwood-gray, antique look like these pieces:
 |
| via DecorPad |
 |
| via interiorconnector.com |
 |
| via Veranda Magazine Driftwood gray with an antique gilded look. Hmmm. This would go nicely with the fabric below! |
 |
| Very neutral and elegant with a hint of gold thread running through it to jazz it up some. |
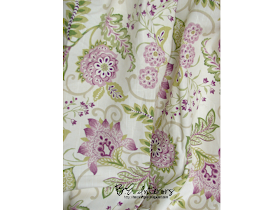
But, I'm not so sure. If you know me, you know I like some color and I started hunting through my stash for some other slightly more colorful option that could potentially appeal to both sexes, and I stumbled upon these. Remember my purple (or plum as I like to call it) fabric I fell in love with a couple of months ago that is so out of my normal color zone? I have both stripes and floral that coordinate... plenty of it. It is still muted, but a little more lively. Hmmmm.....which to use? Play it safe or live on the edge? Muted and elegant or fresh and casual?
 |
| The "masculine" version. |
 |
| The complimentary "feminine" version. |
I plan to line the drawers and the inside of the cabinet areas with fabric. People often don't go past the outside, but I always pull open drawers and doors when I'm looking to buy a piece. I want my furniture interiors to stand out and be like a jewel inside the box! That's the part that only the owner will usually see, so I want to make them smile every time they look at it.
Now that I have my fabric and I know I want that aged gray color, I decide on my paint and finishing method. A smart person would do a test board, but I'm living dangerously and just going with my gut instinct on this one. Hopefully it will turn out like I picture it will in my head! A smart person would also perfect one method and stick with it...I always have to try something new so it's a constant learning curve:)
 |
| My paints and finishes to achieve my "weathered driftwood" look. |
Last, but not least, I look for some hardware that will compliment the furniture style, paint and fabric. Sometimes I just reuse the existing pieces. On this piece, I plan to reuse the pulls, but since I'm missing a knob, replace the knobs. That means they've got to coordinate with the pulls. So, I think I'll go with these:
 |
| New knobs for the doors purchased from Hobby Lobby. |
Now that I've made all the decisions, it's time to pull it all together.
There you go. That's the way I work through the planning stages with a new piece. Now, sometimes surprises come up, I run out of stuff or have to change paths midstream because something just isn't "working", which is what may happen with the fabric choice here. You've got to be flexible. If you get too set on a plan, then you are up against a wall when those issues pop up. Honestly, this is the hardest but most exciting part. I love the planning stage. It's when you're knee deep in the process that sometimes your patience can be tested. Bearing any surprises, I'll now buckle down and "git 'er dun"!
So, until tomorrow, I'll leave you to imagine what the finished armoire will look like.

p.s. Running spell check BEFORE hitting the publish button is always a good idea. Unfortunately, I am too tired tonight to use my good ideas! Oh, well. Better late than never:)


What a great post and beautiful piece of furniture. I can't wait to see your "after".
ReplyDeleteMelissa
You brat!!;>) I was SOOOO sure I was going to see the finished piece when I got done with the reading part. Now NEXT time I come here I will scroll down first so I won't be disappointed. (I'm still smiling) Can't wait to see it- xo Diana
ReplyDeleteOh! This is great!! I have my great grandmother's bedroom suit sitting in my garage. It has some veneer coming off also. I was about to carry the whole thing to Goodwill, but just cannot bring myself to do it. This bedroom suit has been passed down for five generations! It was mine and my husband's when we first got married 25 years ago..I think my niece used it for awhile. Now it has come back to me!! I have to restore it! HOW do I repair the bad veneer??
ReplyDelete♥ Becky in SC ♥ (beckandjoe@bellsouth.net)
Great post! I'm sure it is going to be beautiful :)
ReplyDeleteStacy
Hi there,I enjoy reading through your article post, I wanted to write a little comment to support you and wish you a good continuationAll the best for all your blogging efforts.
ReplyDeleteThanks:
mebel jepara
furniture jepara
mebel jati
mebel minimalis
Get daily suggestions and methods for making $1,000s per day ONLINE totally FREE.
ReplyDeleteJOIN FOR FREE
yeezy boost 350
ReplyDeletelouboutin
nike air max 270
yeezy boost 700
jordan retro
air yeezy
ferragamo belts
nike foamposite
michael kors outlet online
moncler
nike cortez
ReplyDeletejordan retro
goyard
converse
timberland boots
nike air force 1
yeezy shoes
nike max
hermes belt
fitflop
Bonuses click to find out more discover this go to this website anchor Discover More Here
ReplyDeletereplica bags cheap hermes fake g5k53q1g67 replica bags us browse around these guys i3w73s8q48 best replica designer bags replica bags wholesale hong kong p1q81s0u56 replica bags paypal accepted gucci fake g7u31n5v71 replica bags prada
ReplyDelete