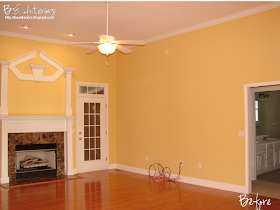
Well, let's see. Sand it? Tried that. I now have a layer of paint & drywall dust all over my dining room...probably on my "new" chandelier as well. I know it's all over poor Scottie Dog! After sanding, I painted it and guess what? I could still see it...plain as day. So, I realized I was going to have to do a little repair. Remember this monstrosity that was over our family room fireplace when we moved in?
 |
| See that lovely "architectural detail" over the fireplace? UGH! |
It didn't come off the wall without a fight. A lot of patching was required, as well as a lot of paint, but I got 'er done! I'm proud to say that now you can't even tell it was ever there (thank goodness!). I've done a lot of repair work over the years, but nothing of that magnitude with drywall and wasn't how sure it was going to come out looking when I finished up (pregnant, mind you!).
This is now:
 |
| Oh, sooooo much better! |
Here's what it looked like prior to starting this whole renovation thing:
 |
| See how I'd painted out a white "frame" around the artwork? Yes, it has come back to haunt me! |
| Now it was about 4 or 5 layers thick! Made a nice CRISP line! |
 |
| UGH! |
So, I made a quick trip up to the building supply and got this. Those guys love me (wink, wink). I think I'm the only woman that comes in that doesn't work there! :
 |
| This stuff is just amazingly smooth...like Bud-ah! |
It's very important to use JOINT COMPOUND on a repair like this...not spackle! It should be quite creamy and fairly thin. Once stirred up (if needed) it should look like this:
Using the dry-wall knife, I put a glob (like that technical word?) on the end:
and GENTLY drug my knife down the wall straddling the area needing to be patched, like so:
 |
| Initial application for coverage. |
Then, I started smoothing by dragging my blade at about a 30 degree angle from the wall with gentle pressure...first down, then in an "X" pattern over the area. This stuff dries really fast, so don't over work it. Dried clumps can get in it and marr your finish. Just get it fairly smooth and move on. Better for it to be too high than too low (not enough). It sands like a dream and that's how you'll get it totally smooth...not with your knife. This stuff is also very forgiving...unlike spackle.
After one coat, it looked like this:
 |
| See the rough spots from appling with the knife? Just sand those babies out till smooth as silk! |
I then took a fine sanding sponge like this:
 |
| Hi-tech equipment needed here (and some focus! Had the kids helping with these shots:). |
and sanded in large circles smoothing it down until it was smooth as a baby's bottom!
 |
| Sanding in large circles. |
When dry, I sanded that layer. I wiped down with a dry rag to get all the dust off (make sure to do this between layers of joint compound as well!). Use your hands to tell you if it's even and smooth... as well as your eyes. That's the trick to stuff like this: use all your senses you can...not just the obvious. Your fingers are super sensitive and will see things the eye can miss initially.
This is what it looked like once all patching and sanding was done:
 |
| Finished patch job. |
Now it was ready for paint. On went the first and second coats of primer to get it even with the walls. And now, that wall is FINALLY ready for the paint treatment!
Rediculous! If I wasn't so hard headed, I'd probably just slap some paint up there and call it a day, but I really want the wallpaper look, so I'm determined to get my dragging technique on there!
In other news.....here's a few things that I'm working on for you in the near future:
- How to make no pattern, pull over, dining chair slip covers,
- How to make a stick/twig mirror, and
- More furniture reveals, of course (speaking of, I may have to take a day or two and get caught up)!
I've got more up my sleeve, but I have to pace myself so I'll keep those a secret until I get to them! Now, go patch up those wall repairs that don't require tape. If you have kids, I'm SURE you can find at least one to practice on. We'll tape on another occasion (although I don't need it to be too soon....BOYS!). Are you reading this?!


I love that you do every job RIGHT. You are not scared to try anything! Great the tutorial, but really hope I never need it! Can't wait for the fianl reveal. Hope you get to rest some this long weekend.
ReplyDeleteI read this article completely regarding the difference of hottest and earlier technologies, it's amazing article.
ReplyDeletemy homepage: rosarium w Chorzowie
Aw, this was an incredibly nice post. Taking a few minutes and actual effort
ReplyDeleteto produce a good article… but what can I say… I put things off a lot and don't manage to get anything done.
Here is my web page ... "transudate"
Here is our website wall repairs. If need any help about home repair please visit our website .
ReplyDeleteSuch knowledge should be well used by us.
ReplyDeleteproforyou.co.uk
Každý víkend som to bol navštíviť
ReplyDeleteako si prajem, pre potešenie, z tejto stránky
v skutočnosti aj náročné vtipné údaje.