Showing posts with label red. Show all posts

Friday, August 10, 2012

Deck Spruce-Up

Our "new" deck!


O.k. I've been holding out on you. Over the last few months my posts have really lagged... for a couple of reasons, the biggest of which is that we have been working on some serious projects to share with you when time would allow me to finish them. Once of these was sprucing up our 12 year old deck.

Our poor deck. It was seriously in need of some TLC - or a sledge-hammer. I preferred the second option but once again that irksome budget thing decided to get in my way. Fortunately for us, Hubby works in the building supply industry. Funny thing is, on may occasions over the last few years "Fortunate" is not how we would have described it! Anyway, there is a fairly new product out there called Encore for wood decks and docks. What it does is basically turn your wood deck/dock into a composite encased deck without having to rebuild it! There is a similar product out there that I've seen at Home Depot called Restore, but the big advantage to me of the Encore is you can make it any color you want versus the limited palette of the Restore. Both only work on a deck/dock that is still structurally sound, though. There is a limit to the miracles you can put in a can!

This was our already rough looking deck when we bought the house several years ago:


The problems just continued to grow over the next few years. Everyday life with deep south humidity, trees, three boys, neighborhood kids and a dog didn't help! But, hey... that's what a decks for! So, out came the pressure washer and deck brush. I think Hubby spent more time taking off any peeling stain and "gunk" with our seriously underpowered pressure washer than he did actually painting it.

You can see a distint line here where he'd made it to as he was scrubbing the old off.

One day, Hubby is going to get a heavy duty pressure washer (wink, wink)
that could strip the deck right off the house! No scrubbing required!


This shot really shows how bad the seats and railing were looking. 


Stripped down and ready to go.

This was primarily a hubby project. We both worked on the first coat, but hubby did the second and all the railings. I have to admit, I had my doubts it could turn out this nice, but was pleasantly surprised. It's still not a cheap redo, but compared to replacing a deck, it was pennies on the dollar. Our's had hit the point that something had to be done and it simply couldn't be put off any longer. Structurally it was sound, but some boards were starting to warp and splinter and the stain was long gone. We didn't want any rot to set in so cue the Encore.


This stuff is super thick and dries really quick, so you have to work fast and efficiently (especially in southern heat/sun!). It layers the entire deck surface with a thick gritty composite like coating without the plastic look. No more splinters or even obvious cracks if you put it on thick enough (and put a few hundred wood screw into flatten out warped boards!).

There was a good bit of prep work, as with the garage floor painting, but that is crucial for how well the end product holds up.  In order to get a good color match to the brick, I simply took a scrap piece of brick into Home Depot and had them match the color in Behr (Chocolate Sparkle!) exterior latex gloss (which has the most enamel/toughness) which was then added into the mix to tint it. On the railings, we simply mixed the paint with another product of their's called Polymatrx that extends the life of exterior paint.


So, for few hundred dollars, we have a new looking deck and you have a better idea how I've been passing time! There's more to come, so stay tuned:)

Friday, August 5, 2011

School Desk Reveal

♪"Schoooool's (still) .....out.. for.. the summer..."♪,

but I'm working on a school desk! Go figure:) Actually I just finished up this little school desk I found out yard sailing not too long ago. It was in really good shape.  I immediately grabbed it as there are a ton of home schoolers around here who'd probably love to get their hands on one. Let's just hope it's a boy who likes racing stripes!


Would you believe I forgot to take a true "Before" picture?! UGH! Sometimes I get ahead of myself and jump on a project before getting my ducks in a row. I'm sure none of you ever do that:) I remembered after I'd slapped on some Zinser Bin Primer.


It was all this color wood. I at least remembered to take pictures before getting primer on all of it! 

First, I lightly sanded the whole thing, then masked off the wood. Krylon's Oil Rubbed Bronze spray paint was applied to the metal and allowed to dry. Then, the desk was coated in primer.


After appling a coat of Sherwin Williams "Rice Grain".

After applying stripes prior to sanding, staining and waxing.

Nice and neat stripes that I was about to rough up and stain. That part always pains me, but I love the after.
A layer of SW Rice Grain in satin was applied (that I found at the Habitat ReStore - a whole gallon for about $5!), some stripes were masked out with my favorite painters tape - Scotch Blue Delicate, a thin layer of sealant brushed on to make double sure of no leakage under the tape, and then navy stripes were painted in BM Midnight Blue. Lastly I re-taped the red stripe, sealed and applied some red acrylic paint. After it was all dry, I wiped on a layer of Minwax Dark Walnut stain to age it, then applied Minwax clear wax. Done! Sounds quicker than it actually was! I love how the stain, sanding and wax gave it a well worn and loved look.


Now it looks loved and worn from time (wink, wink).


Nice and lightly worn.

The finished product which is now in the booth.

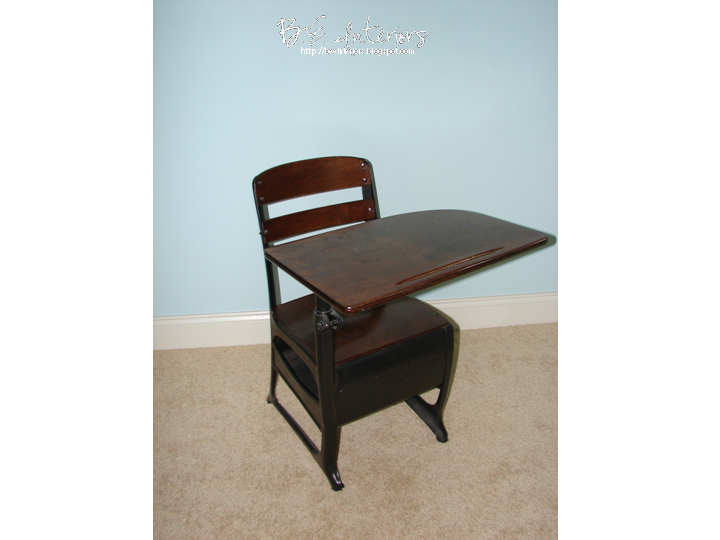
Funny thing is my first refinishing/repair project was a little desk just like this several years ago and now sits in the boys room and has gotten TONS of use as both a homework and art spot as well as a timeout chair:)

This was my first little desk and refurbish job that put the bug in my blood:)

And lastly, I guess I'll spill the beans on the current big project, like you've not already guessed it...the love seat shown in it's before stages here:

I'll be as excited as anyone to see the finished redo on this baby!

I've pulled so many staples today that I have blisters forming on my hands and a crick in my back from leaning over. I have a whole new appreciation for upholsters! They earn EVERY single penny they charge and must have the patience of Job! Once I FINALLY get all those staples out, it should be quick work (please no surprises!).


Monday, July 25, 2011

Red Surprise!


"Along the Dog Walk"
B.E. Interiors Photography

"Red Splendor"
B.E. Interiors Photography


"Red Berries"
B.E. Interiors Photography

Surprise! You thought I wouldn't be doing a posting this week...didn't you?! O.k. truth be told, I'm not. This is a scheduled post because I just can't leave you hanging for a solid week. That's just wrong! I love you guys too much:)

So, I thought I would use this week to do some simple inspiration posts. I'm currently working on a furture weekly series on being inspired. I'll leave you wondering and waiting with that:) For this week, I've scheduled different dominant colors and inspiration pictures using it. Enjoy!

Before we start, here's a quick review of some color theory. If you look at the color directly across from it on the color wheel, that is the complimentary color. They intensify each other whereas close together on the color wheel (analogous or monochromatic) are more calming. The warmer the color the more energetic it is and vice versa. Here's fun little rule of thumb:

Sticking close to friends and near family is comfortable and relaxing (i.e. colors close together on the wheel), but going cross country is new territory and stimulating and can possibly exhaust you after a while (complimentary colors)!


color wheel displaying active - passive ranges 


Introducing our color of the day, which you probably guessed from the pictures:

RED!

There are many shades of red. It's one of those colors that you have to be careful with because it's INTENSE. Some like it hot, other's not so much. There's not a right shade, but there are right ways to use it. Careful attention has to be paid to the rest of the colors in the room, not just paint and fabric...for instance red toned wood, floors, views out the room (i.e. red brick). It also needs a balance with a fair amount of light tones to counteract the intensity. Black and white are classic combinations, but cream also works well. It softens the intensity while white tends to enhance. Another color that will intensify red is it's complimentary color...green. This would be true with any color.

Check out just a few of the shades available out there:


via Your Decorating Hot Line
 A couple of these images were pulled from a great post on using red that would be well worth your while to look up at Your Decorating Hot Line blog.


Fantastic idea for just a perfect pop of color via Elle Decor.


Vibrant and warm by Candice Olson.

Subtle touches by Sarah Richardson.


Frenchy and fairly intense, yet all the wood and cream balance it.
via Decor Magazine 2004


Red as an accent color via Southern Living.
 
Red as the very dominant color and even enhanced with greenery,
yet balanced with cream, black and yellow toned wood.
via Southern Living


Furniture accents via Southern Living.


Earthy red and one of my favorites by Sarah Richardson.


Great front door and accents of red.
Another favorite via Southern Living.

Do  you like red? I went through a red phase a few years ago, and then had to purge it all after moving here. I'm finding I'm just now starting to like it again after 3 years! It's a strong color, so think long and hard about using it in large or concentrated doses. As much as I love color, red is what finally made me realize I needed fairly neutral surroundings! Don't even get me started with what it does to kids or to your grocery bill!

Follow Me on Pinterest